Showing posts with label tips and tricks. Show all posts

Tuesday, April 15, 2008

Windows Mobile Tip: Accessing the Run dialog

Windows Mobile has had a run dialog similiar to the one found in desktop versions of Windows since Windows 95 for as long as I can remember. This feature is not well known however.

On the main Today screeen of a Windows Mobile powered Pocket PC (Windows Mobile Professional or Classic for those up with the current lingo) you can tap and hold down the ‘Action’ key while tapping and holding the stylus on the clock shown on the nav bar. The ‘Action’ key is usually the center of the D-Pad or Ctrl if you are using the emulator.

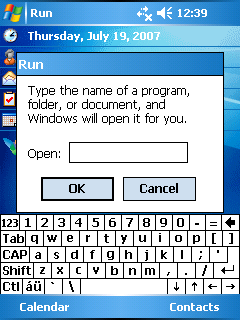
When you release the ‘Action’ key a small popup menu will appear, and you can select the ‘Run’ option which will display a small dialog.

Within this dialog you can enter the path to any executable, as well as any required command line parameters.

Examples you may like to try out are as follows:

  • calc.exe
  • iexplore.exe
  • ctlpnl.exe cplmain.cpl,4,0

For more details on accessing control panel applets from the command line, like the last example demonstrates refer to the Using Control Panel article on the Pocket PC Developer Network website.

This feature can be handy during development of applications for tasks such as re-registering COM dlls, however it is rather impractical for day to day use due to the typical slowness of entering the command line and the fact that unlike on the desktop there is no history of previous commands.

As an additional tip, did you know that if you tap and hold without the ‘Action’ key being pressed a different popup menu will appear? This one allowing you to select between an analogue and digital clock being displayed on the navbar.

Christopher Fairbairn

ListView columns reorderable

Another finishing touch that I like to see in applications that use ListViews is the ability for the end user to re-order the columns to suit their own preferences. This blog entry discusses one approach for adding this functionality to the ListView control present within the .NET Compact Framework.
Although it is difficult to convey in a static screenshot, the screenshot above shows a user dragging the stylus over the header of the listview control to move the position of the “First Name” column.

Obtaining Draggable Columns


The System.Windows.Forms.ListView control is a wrapper over top of the native ListView control. The native ListView control supports the notion of extended styles, which allow various optional features to be enabled or disabled as desired. One of the extended styles is called LVS_EX_HEADERDRAGDROP. If this extended style is enabled the user can re-order the columns by dragging and dropping the headers shown at the top of the listview while it is in report mode.

Although the .NET Compact Framework ListView control does not expose a mechanism to enable extended styles, we can use a technique discussed in a previous blog entry of mine to add or remove the LVS_EX_HEADERDRAGDROP extended style as desired.


private const int LVM_SETEXTENDEDLISTVIEWSTYLE = 0x1000 + 54;
private const int LVS_EX_HEADERDRAGDROP = 0x00000010;

public static void SetAllowDraggableColumns(this ListView lv, bool enabled)
{
// Add or remove the LVS_EX_HEADERDRAGDROP extended
// style based upon the state of the enabled parameter.
Message msg = new Message();
msg.HWnd = lv.Handle;
msg.Msg = LVM_SETEXTENDEDLISTVIEWSTYLE;
msg.WParam = (IntPtr)LVS_EX_HEADERDRAGDROP;
msg.LParam = enabled ? (IntPtr)LVS_EX_HEADERDRAGDROP : IntPtr.Zero;

// Send the message to the listview control
MessageWindow.SendMessage(ref msg);
}

This method allows the drag feature to be turned on and off for a given ListView control. Notice that this method makes use of a C# 3.0 feature called Extension Methods. The “this” keyword in front of the first parameter means that this method can be called as if it was part of the standard ListView control, meaning the following code snippet will work (assuming listView1 is an instance of the System.Windows.Forms.ListView control).

listView1.SetAllowDraggableColumns(true);

This is pure syntactic sugar, behind the scenes the C# compiler is simply passing in listView1 as the first parameter to the SetAllowDraggableColumns method.


Persisting Column Order Preferences

Once you have reorder-able columns it can be desirable to persist the user’s preferred layout across multiple executions of your application. It would be a pain if the columns always defaulted back to a standard order everytime the form was displayed.

The native ListView control provides two window messages, LVM_GETCOLUMNORDERARRAY and LVM_SETCOLUMNORDERARRAY that can be used to implement this feature. The code sample available for download wraps up these two window messages to allow you to query the current order of the columns by using a statement such as the following:

int[] columnOrder = listView1.GetColumnOrder();
// TODO: save 'columnOrder' to the registry
// or another persistent store

When columns are added to a ListView they are given an index. The first column is column 0 while the second is column 1 and so on. When columns are re-ordered they keep their index value but their position on screen changes. The array returned by the GetColumnOrder function contains the index for each column in the order that they are visible on screen. For example if the array contains the values 2, 0, and 1 it means that the last column (column 2) has been dragged from the right hand side of the listview to become the left most column.

Once we have obtained the order of the columns we can store the data in any persistent storage mechanism such as a file, a database table, or registry key. When the form is reloaded we can initialise the default order of the columns by calling the equivalent SetColumnOrder method with the value we previously saved:

// TODO: should read 'columnOrder' from the registry
// or other persistent store
int[] columnOrder = new int[]{2, 0, 1};

listView1.SetColumnOrder(columnOrder);
Christopher Fairbairn

Monday, April 14, 2008

Windows Vista - Boot faster

First thing you should do is always get rid of your temporary files and any unused programs. Once you have done that then run the defrag tool to reorganize your hard drive. Defragmenting your files puts them back into one contiguous space on your drive optimizing your boot time.

To get Vista's defrag tool to give you some information about your hard disk, and to control which hard disk or partition it defragments, you will need to use the command line defragmentation utility. It will still not give you any feedback while defragmenting, just as the GUI version of the defragmenter will not, but at least you can get information on the fragmentation level of your hard disk, control whether to defragment even if the file fragments are larger than 64 MB, and control which partition or hard disk to defragment.

To use the command line defrag tool in Windows Vista, you have to run the Command Prompt as an administrator. In Vista, this is not automatic even if you are logged in as the administrator. Click the Windows button (previously the Start button in earlier versions of Windows), the All Programs menu item and the Accessories menu item. Right click the "Command Prompt" button and select "Run as administrator". A command prompt window will appear. Everything you run in this Window will be run with administrator rights.

To view a file fragmentation analysis of (say) your C: drive, type:

defrag c: -a -v

The "-a" parameter tells the defragger to perform a fragmentation analysis. The "-v" option tells it to be verbose in its report. If you want a report on drive D: or some other drive, substitute that drive letter in place of c:.

To defragment a particular drive, say C:, type:

  1. defrag c: -v -r

    The "-r" option tells the defragmentation utility to treat files that are fragmented with 64 MB fragments or larger as though they are not fragmented. This partial defragmentation is the default for "defrag", and it's the only way the GUI defragmenter in Vista works.

    You can also force the defragmenter to defragment everything. That is, even if the file fragments are larger than 64MB, the Vista defragmenter will still attempt to put the file into contiguous sectors. To do this, run the defragger with the following options:

    2. defrag c: -v -w

    As you have probably have guessed, "-w" tells the Vista defrag tool to do a full defragmentation. All file fragments will be consolidated where possible.

    You will still not get any feedback as to the progress of the defragmentation with the command line tool, just as you did not with the GUI version. However, at the beginning and the end of the defragmentation, "defrag" with the "-v" option will give a report, much like the old Windows XP GUI defragmentation utility. Again, though, it will not report fragmented files with 64 MB fragments (or larger) as being fragmented.

Please NOTE: With the command line method there is no progress bar so you just have to sit and wait for it to finish.

If defragging doesn’t really help your boot performance then you should at least see improvement in your application load times when the operating system is finally booted up.

Also there is one quick edit to the registry that can make Vista shut down quicker than you can say “shut down.” Those not comfortable with delving in to the registry had better not proceed because making a mistake here could (and usually does) mess up your system bad.

At the Start Menu, type “regedit” without the quotes in the search box and hit Enter. Find HKEY_LOCAL_MACHINE/SYSTEM/CurrentControlSet/Control and go to the Control folder, right click the entry “WaitToKillServiceTimeout” and set the value to something lower, 1000 is usually good (the numbers represent milliseconds). The default value is a (too) generous 20000. However, the cost with this is that it won’t give running programs much time to save data so losing work using the tweak is a definite possibility.
OneNote - Sharing documents

There used to be a problem here at work. We didn't managed to share documents properly. We tried lots of methods, till we finally checked OneNote. You can easily tag information, and search for this quickly, and can even insert printouts into notebooks.

I was thinking that being in a company, the sharing documents feature is a request so i took a look over the capabilities of that software. Here are the simplest 3 ways of sharing documents between all:

A. You can create a OneNote notebook that’s enabled for sharing. You can then put this notebook on a Windows share on your network. Then you can open this notebook from the share on multiple machines, and each OneNote instance on a machine will figure out how to sync with this version on the network share. Each OneNote instance creates a local copy of the notebook and periodically syncs it’s local copy with the network copy. It’s constantly doing a diff, to figure out what change, and then committing those changes. It’s super easy to setup, and it works great!

B. You can tell OneNote to create a new shared notebook on your machine. OneNote will then create the notebook, and then create a network share automatically for that notebook and expose it to the network! Very easy too. The difference between this approach and the first is that in this case, the network share is on your machine, and in #1 the share is on a different machine.

C. The last approach is very cool as well. You can start a Live Sharing session in OneNote, and allow other OneNote users on the network interactively edit your notebook with you! They don’t have to have a copy of the notebook on their machines either! You just start a Live Sharing session and OneNote takes care of the rest… it starts a sharing server on a port, and opens a hole in the firewall. Then on the other machine, you simply connect to a live sharing session on the first machine (by providing it’s WINS name or IP address) and you are good to go! It works brilliantly! When you are done with your sharing session, a local copy is left on the remote machine, which you can work with locally! You can reconnect to the live sharing session later, etc. This is brilliant! What a great use of P2P technology! I’m surprised Microsoft doesn’t advertise this feature more.

OneNote is very helpfully if you want to manage lots of fluid information that must be persisted and replicated reliably, without having to copy files, and run cron jobs, or know how to use SVN and setup a SVN server.